If you have not yet downloaded ServeToMe, you can download it here:.
Please note that the ServeToMe server is not available on the Mac App Store. You must download the ServeToMe server directly from our website (don't confuse the StreamToMe product on the Mac App Store — that is the player app, not the server).

Left: Mac ServeToMe installation. Right: Windows ServeToMe installer.
On Windows, the ServeToMe program will start automatically at the end of the installation process. On the Mac, you should open the Applications folder and launch ServeToMe or locate ServeToMe in the Launchpad (Mac OS X 10.7 or newer) and launch it from there.
When ServeToMe is running, there will be an icon in right of the Mac menubar or right of the Windows notification area (aka System Tray in the taskbar).
![]()
Left: ServeToMe running on the Mac. Right: ServeToMe running on Windows.
Left-click on the icon (Mac) or right-click on the icon (Windows) to display the ServeToMe menu which you can use to display the ServeToMe window or start/stop the server.
If you see a message about Bonjour missing while running ServeToMe on Windows, we strongly recommend that you install Bonjour for Windows. While not required for ServeToMe, it can make a number of networking features significantly simpler.
When ServeToMe starts for the first time, it will show the ServeToMe window.
On first startup, the status line at the top of the window will briefly show the message: "Updating font cache, please wait...". This message may remain for approximately 1-2 minutes after which time the server will start.

ServeToMe "Updating font cache" state.
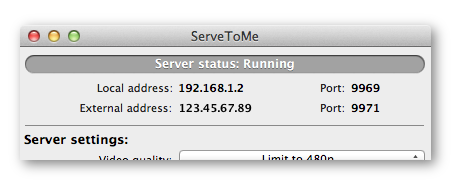
After the font caching is complete, ServeToMe will start the server and if all goes well, should show a "Server status: Running" message.

ServeToMe "Running" state.
There are three "Server Settings" in the ServeToMe window: "Video quality", "Require password" and "Port (0 for automatic)".

ServeToMe "Server settings" section.
The "Video quality" allows you to limit CPU usage when ServeToMe needs to live-convert video. The default quality is 480p which should work on most CPUs from the last 5 years or more but if you have a faster or slower CPU, you might want to adjust this value to get better quality or reduce the CPU burden on your server computer.
The "Require password" allows you to password protect your server. Since ServeToMe is a read-only server, unwanted guests cannot change anything on your computer but if you wish to keep your privacy, you may want to set a password for the server.
Most of the time, you will not need to change the "Port (0 for automatic)" value. However, if you have multiple computers on your local network running ServeToMe, only one can be reached from outside your local network on a given port. Use this value to force additional computers to use different ports from the default 9969 port. An example is that you can set your different computers to run on ports 9969, 9979, 9989 so they don't all conflict while trying to use the same 9969 default port number.
Port numbers are part of internet addresses. You might not see them in normal web addresses because the standard web port 80 is omitted from web addresses. For example, this website is actually http://projectswithlove.com:80 (where 80 is the port number) but if you leave the ":80" part out of the address, it is included automatically (in fact it is normally hidden if you try to include it). ServeToMe uses 9969 by default — a number chosen to avoid conflicts with other common services.

Left: Library Integration (Mac). Right: Library Integration (Windows).
By default, ServeToMe will also attempt to locate your iTunes Library. If it could not locate your iTunes Library in the default location, you may see an "iTunes Library sharing disabled" message on startup. You can use the "Change Library XML..." button to select the location of your iTunes Library to share with ServeToMe. You can also use the checkbox to disable or enable sharing of your iTunes Library at any time.
On the Mac, ServeToMe will also attempt to locate your iPhoto Library (this feature does not appear on Windows since iPhoto is not available for Windows). As with iTunes Library sharing, you can use the "Change iPhoto Library..." button to select the location of your iPhoto Library to share with ServeToMe. You can also use the checkbox to disable or enable sharing of your iPhoto Library at any time.

Shared Folders section
By default, ServeToMe will attempt to locate the default Movies/Videos folder for your account and add it to the list of Shared Folders. It may also add the Music or Photos folders for your account. If your media is stored in different locations, then use the "+" button underneath the list of Shared Folders to add the locations where your media is stored.
A full list of further topics is give on the ServeToMe support topics page.